|
|
Amicus Attorney uses Precedents to save a related series of Events to be used repeatedly. For example, different courts or judges may have a series of deadlines based upon the trial date. With Amicus Attorney you can save that series as a "Precedent" and reuse it each time the firm has a court date with that court or judge. If the court date is changed, all dependent dates are also changed by the rules set up in the Precedent. So if you have a chain of 20 Events related to a court date, and that date is changed, you modify the court date within Amicus Attorney and each of those 20 Events changes to the appropriate date automatically.
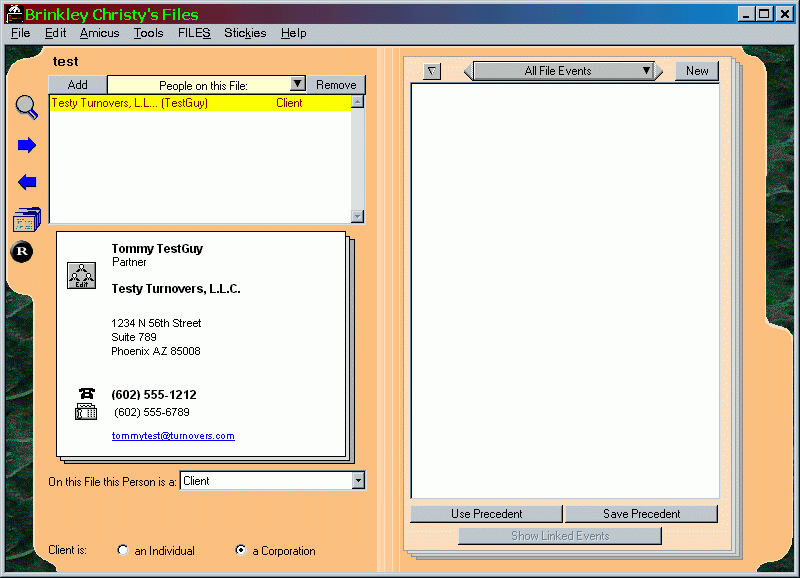
There are several ways of creating Precedents. The Amicus Attorney manual describes a way of creating Precedents by using the Events already entered on a file, then establishing a set of rules for each of those Events. Here I will describe a method of creating Precedents from scratch. Doing it this way can be less confusing because you will be dealing with only those Events that are to be included in the Precedent. As an example we will create a hypothetical Precedent for filing a simple motion. The first step is to create a new and clean test client that has no activity before we start. It could be called test, or temp, or sample, or eraseme for example, and should be set as nonbillable so it isn't transferred to the billing program.
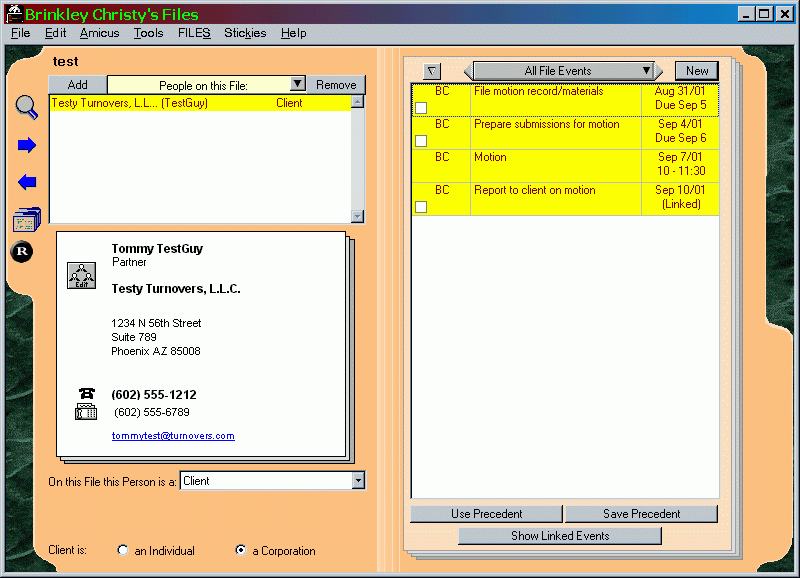
For our purpose the simple motion will consist of 4 steps: The motion for production, preparing submissions for the motion, filing the motion, and reporting the motion to the client. These Events will need to be entered, and rules relating the Events defined. To create a Precedent we will have to be on the Events page of our newly created file. Our screen should look something like the figure below. On the Organizer edition (designed for sole proprietorships only) instead of "All File Events" you will chose "All My Events". We begin by entering the primary Event that other Events are based on. By clicking on the "New" button in the upper right, we are ready to create a new Event.
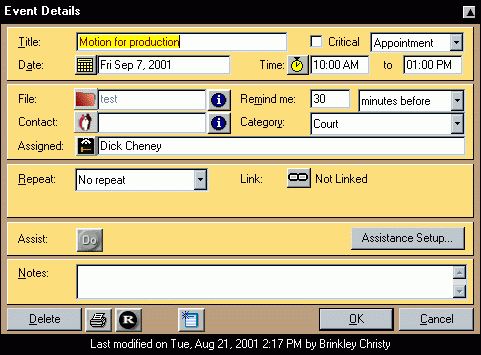
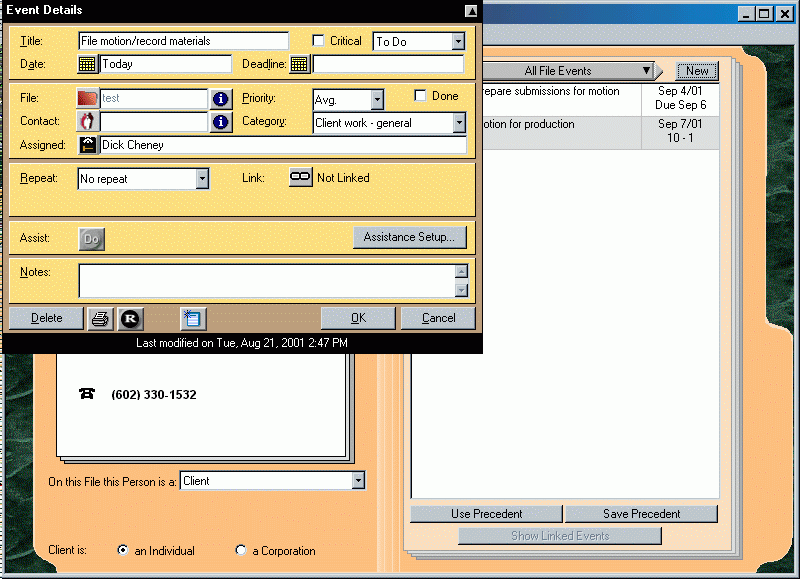
The screen to create that Event follows. This is the base Event that other Events are based on. Fill in the title, associate a File and Team Member, and give it a Category. Save the Event once created.
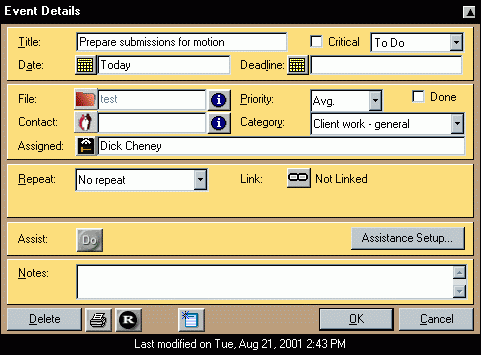
Next we enter the Events whose time or due date or deadline is based upon the first Event - again by clicking on "new" in the upper right corner. Note that since the time of occurrence of this Event is dependent on the time of the first, we don't need to enter a deadline date in the Event Details Screen. Also note that the Link button is labeled "Not Linked".
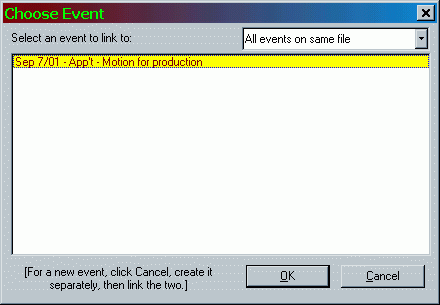
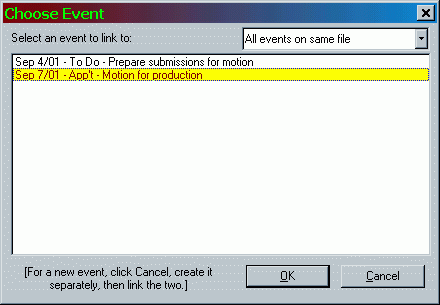
By clicking the Link button we get the following dialogue window. We see a list of all other Events associated with this file (in this case only one). From this list we choose which one to link our new Event to. Motion for production is our choice, so by highlighting it and clicking "OK" we are moved to the Link Events window.
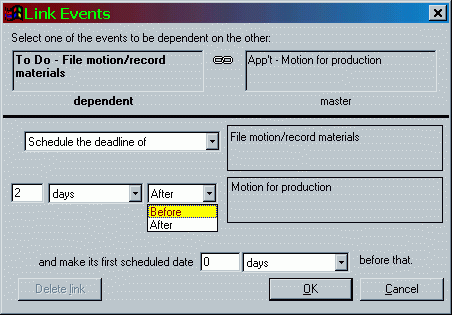
It's here that we define the nature of the relationship of our dependent Event to the Event it is linked to (its master Event). Note that you can schedule it or schedule its deadline, whichever seems more appropriate. On a ToDo page you have both those fields to fill in, with the deadline optional. It works the same here. By looking at the next screen, note how the last line to be filled in changes dependent on whether an Event or deadline is scheduled.
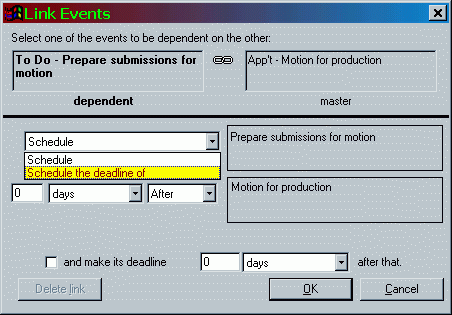
In this case we'll schedule deadline for the preparation of submissions for a motion 1 day before the motion production, and have it show up on our ToDo list 2 days before that.
We now see two Events on our Events list.

If we double click the Prepare submissions for motion Event, we'll see that Link Button says that this Event is linked to one other Event. A dependent Event can only be linked to one Event, but a master Event can be linked to many dependent Events. Any Event can be a dependent Event, a master Event, both, or neither.

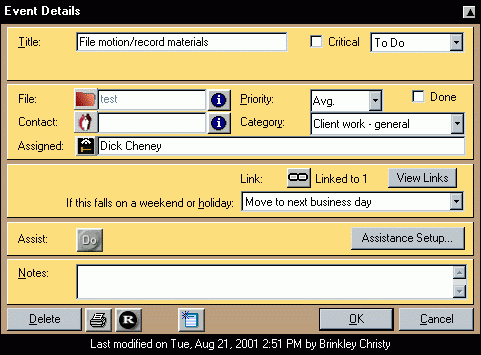
After closing that window and clicking "New" to create a new Event, we'll create the the Event "File motion/record materials", and click the Link button.
Once again, we see the entire list of Events for this file, to which we can attach our current Event. Note that we don't need to link this to the original Event, but can link it to an Event linked to that Event, creating a hierarchy of dependencies.
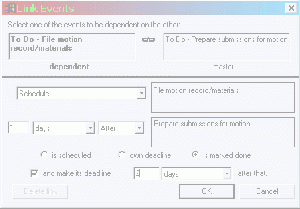
If your screen resolution is at least 800x600 and your browser is maximized, you'll see a faded smaller window next to the real Link Events window. On this window you should notice that this is linked to the ToDo "Prepare submissions for motion" instead of the Appointment "Motion for production". When linking to a master ToDo instead of a master Appointment, some of the options are different. To keep the calendar from becoming cluttered, you can set the Event to not become active until the master Event is marked done, regardless of its due or deadline dates. Also note that our Event is now dependent on the completion of an Event that is dependent on the original Event instead of being directly linked to the original Event. You could also create two independent chains of linked events and save them into the same Precedent.
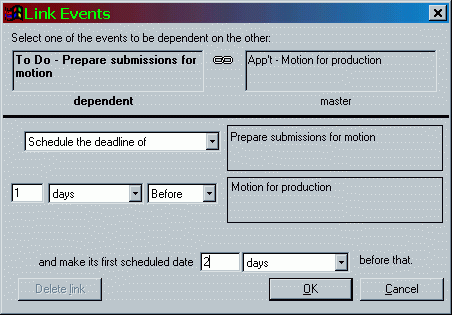
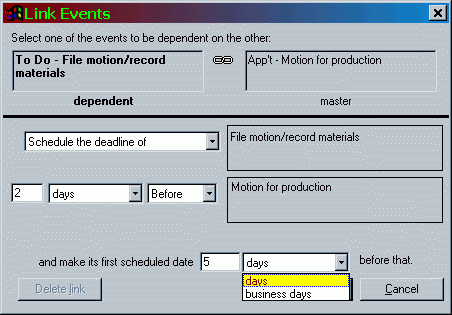
We will schedule the deadline of our "File motion/record materials" ToDo two days before our master Event, "Motion for Production", and set it up to begin appearing on our ToDo list five days before that.
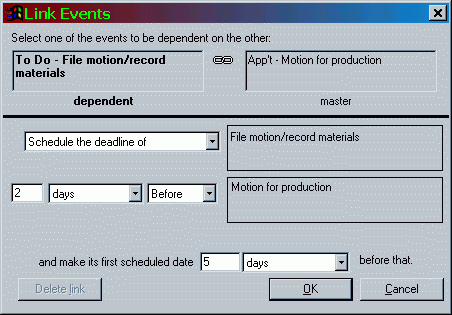
Note that we could have scheduled it 5 business days before as opposed to 5 calendar days before.
If we reopen "File motion/record materials", we'll note that it is now linked to one other Event.
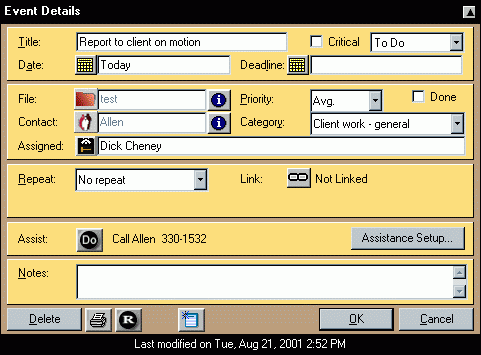
The final step of this simple motion Precedent will to be to report to client on the motion, so we'll create a new ToDo Event called "Report to client on the motion", and click the Link button.
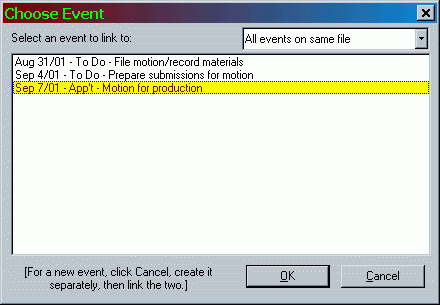
We now see three Events associated with the file, any of which we can choose to link "Report to client on the motion" to. We'll chose the same Event we are linking all the Events for this Precedent to, "Motion for Production", by highlighting and clicking OK, or double clicking, or highlighting and pressing Enter.
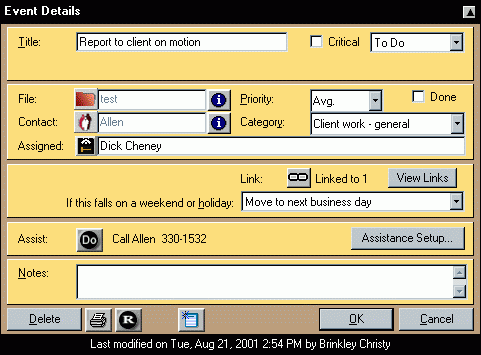
We will schedule this to happen one day after the "Motion for Production" and not require a deadline.

If we open the Event, we see that it is now linked to one other Event.
What we now have is a series of linked Events in the file Test. If we change the date of the Event "Motion for Production" that all other Events are linked to, the date on those linked Events will change per the rules we have set up. But we don't yet have anything we can reuse on other client files. To do this we still need to create a Precedent. This series of linked Events then becomes a Precedent we can use whenever it becomes appropriate for our firm, and the rules will be accurate and consistent each time it is used. To do this we mark each Event we want in our Precedent while holding down the Ctrl key (general Windows marking rules apply here). Each Event turns yellow when it is marked. After all the appropriate Events are marked, which would be all Events if we followed the procedure as described above, we then click the "Save Precedent" button at the bottom right of the Window.
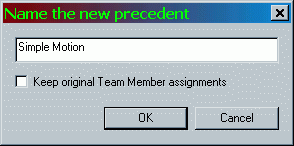
We then name the Precedent. We'll call it Simple Motion for our example here. Note that we can check "Keep Original Team Member assignments", which should work well for sole practitioners. If we don't check this, we'll have to assign Team Members for each Event.
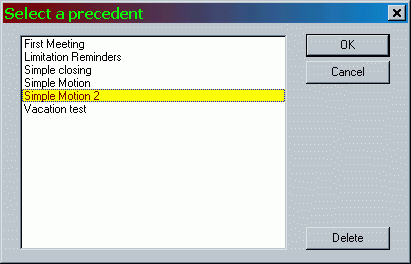
After saving the Precedent, you can click the "Use Precedent" button to see the list of Precedents available to you and your firm. Any precedent on this list is available to put on the Events page of any client file in Amicus Attorney. To practice with or test this or other Precedents, you can delete all Events assigned to your test client and use this and any other Precedents. You can delete any or all the Events (or not) after each experiment, maintaining a clean area to work with. Note that you can also delete a Precedent, and that if you do, you will be deleting it for the entire firm. It is a good idea to export you Precedents to a file for easy recovery or for transferring to other Amicus Attorney installations.
In security in Amicus Administator you can setup who can and cannot "Create or delete Precedents".

To discuss your office automation needs, to order Amicus Attorney® or additional Amicus Attorney® offices, to upgrade to Amicus Attorney® V ,
for help in setting up, customizing, or troubleshooting Amicus Attorney®. or to arrange training for yourself or your entire firm, call:
Steve Henes Computer Support
Voice (602) 957-4496
FAX (602) 957-4414
or write:
3104 E Camelback Rd, #578
Phoenix, AZ 85016
|